- ALERTS TICKETING Feature
- What Alert System does
- Alert Sources Diagram
- Alert Ticketing Overview Display
- Simple Alerts Dismiss or the Full Triage System?
- Alert Operation
- Ticketing Full Status Tracking
- How to Use Alerts and Ticketing
- Using the Alert Tabbed Grid
- Retrieving Windows Alerts
- Using Alerts and Simple Alert Dismissal
- A Diagram of the Ticketing Process
- Communicating with Engineers by Email
- The eMail *COMMAND*s between Toolbox <-> Engineer
- Using the Ticket Summary Dialog
- The Ticketing Panel Description
- Using Alert Filters
- Setting up Alert Filters in Detail
- Using Triage to Job Ticket System
- Using Triage to Modify Alerts
- Using Triage to Perform Direct Action
- Ticket Creation and Processing
- Full List of Engineer Requests
ALERTS TICKETING Feature
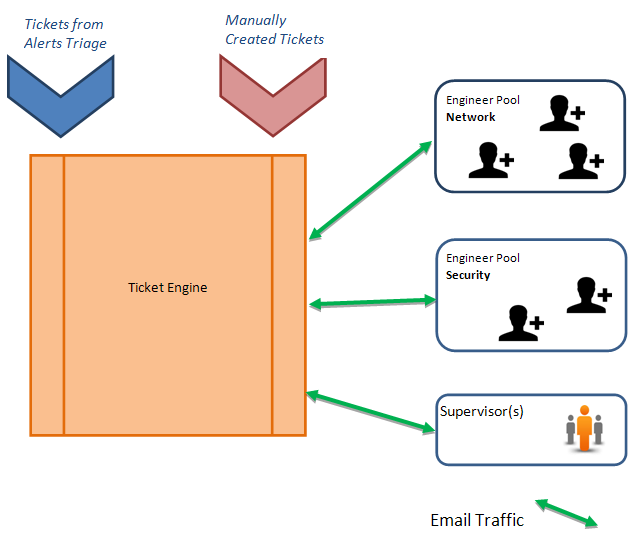
Alerts and Ticketing is a from the ground up, Integrated system (not a bolted-on package with a different GUI). It pulls together Alerts from Toolbox Monitoring and External Alerts such as Syslog, and then Classifies and Presents them throughout the system including in Toolbox Live Maps (including Probes).
Tickets can be generated Automatically or added Manually and sent to general or specialised Teams. The system automatically Tracks and chases up Tickets by talking to engineer and supervisor pools, using an elegant but world class setup. A diagram illustrates Polling operation, see next page.
What Alert System does
The system is designed to Analyse and Classify Alerts and work with other (SIEM) Alert Management Systems to Display Alerts in the Distributed Toolbox GUI especially in the Live Maps.
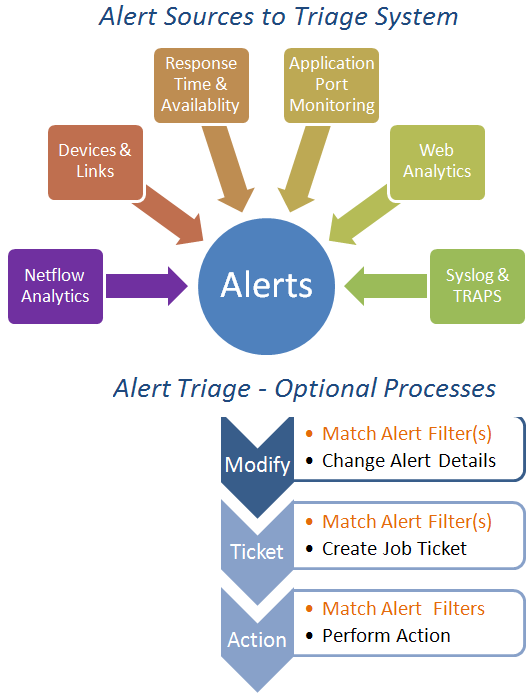
Alerts are created by Monitors within Toolbox and Externally by network devices as SNMP TRAPs and Syslog messages. These sources are combined in Alerts processing and viewed in the raw Alert form in the Review Alerts top panel. The Alerts are broken down into many categories (user programmable) and displayed in Standard and (optionally) in User Created Dashboards.
Alerts can be modified, collected together using Triage (kills alert floods) and can be used to create Job Tickets. First Alerts must be Classified with a Filter Matcher using the Alert Filter system, this saves time later as Alert Classifications (filters) can be applied in Map Animations too.
Incoming Alerts may be modified say to change priority or change the message to something easy to understand. They can then be re-transmitted as TRAPS or Syslog or just processed internally.
The Job Ticketing system works with Triage and is a powerful but simple Job Ticket Allocation system with 3 Ticket Priorities. A Pool of Engineers is created by the user to address specific functions such as Server maintenance or geographical areas. A single interface specifies actions per Ticket Priority including a full set of Reports to Track Engineers and Ticket Progress.
Alert Sources Diagram
Alert Ticketing Overview Display
A quick dismiss Alerts mechanism can be used if the full Alerts Triage and Ticketing system is not required.
An example of the Alerts GUI with a list of alerts below:
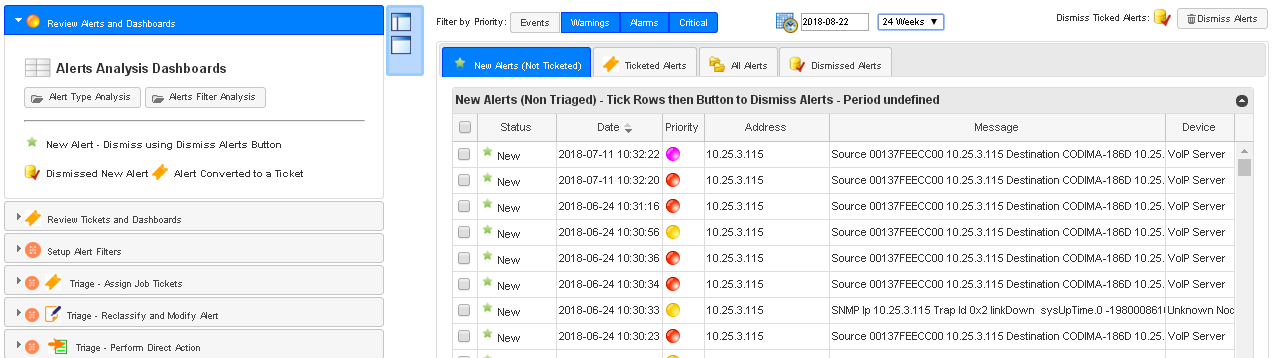
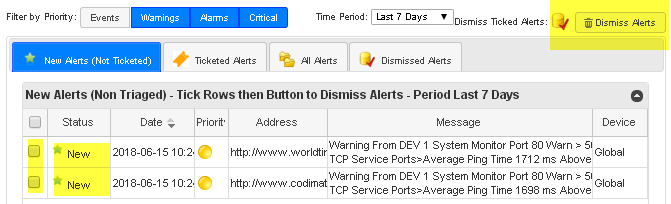
New Alerts (Non Triaged) – Tick Rows then Button to Dismiss Alerts, see below:
Simple Alerts Dismiss or the Full Triage System?
Alert Operation
Processing Incoming New Alerts can be
- ticked in the New Alerts display to Dismiss them
or 2) be intelligently processed by the Alert Triage System.
1) Simple New Alerts Dismissal Process
- + It is simple to use.
- + No setup required.
- – All Alerts have to be manually dismissed.
- – Cannot create tickets automatically.
- – Cannot automatically suppress alert floods.
2) Triage New Alerts Process
- + Automatically suppresses alert floods by converting them to a ticket (the Alerts are linked to the Ticket for later drill down).
- + Creates Tickets to allocate engineer resources and track fix processing.
- + Extensive reports to analyse alerts based on Triage Classification.
- – Requires setup of engineer’s pool, email, Alert Tickets and Triage Rules.
Ticketing Full Status Tracking
This is a very major upgrade that allows full tracking and also interaction with both Engineers and tickets – see except from Help System below: –
The right-side Window contains the Ticket Summary Grid which gives a live update of Ticket Status: –
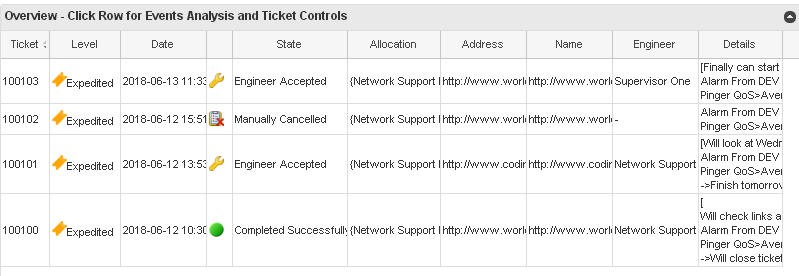
On clicking on a Ticket Row the Ticket Summary appears as below: –
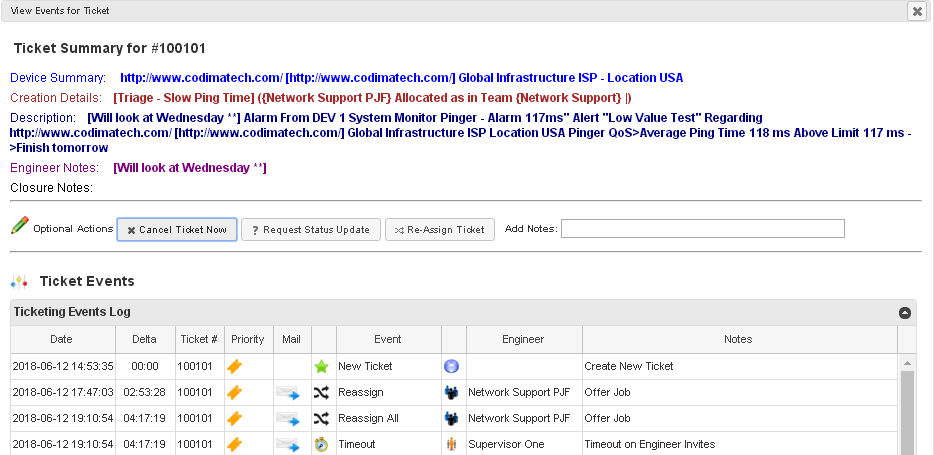
Here it is possible to Cancel the Ticket immediately, Request an Update from the assigned engineer, or Re-Assign the Ticket to another Engineer.
How to Use Alerts and Ticketing
Alerts of all kinds are initially displayed in the Alerts Tab top panel grid.
They can be simply Dismissed or use the automated dismissal using the Triage System by creating a Job Ticket.
However, if there is a Triage Rule that matches any incoming Alert then it will be automatically acknowledged and be removed from the top panel grid. The matching Alerts are retained in the system and attached to the matching Triage Rule which are viewable in Triage Analysis Grid Reports.
Key to using the Triage System is to setup Alert Filter matcher(s) as these are used to Trigger Triage Rule Matches.
Using the Alert Tabbed Grid
The Grid shows New Alerts: that can be Dismissed as explained under Using Alerts and Simple Alert Dismissal.
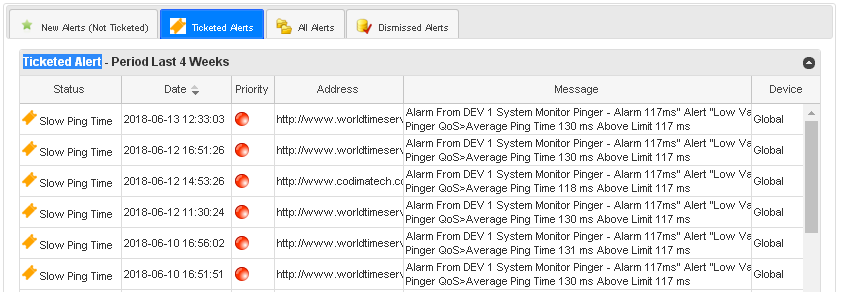
Ticketed Alerts are Alerts that have been Successfully Triaged under the Triage Rule listed in the Status Column – in this case Alerts have been Ticketed using the Slow Ping Time Triage rule.
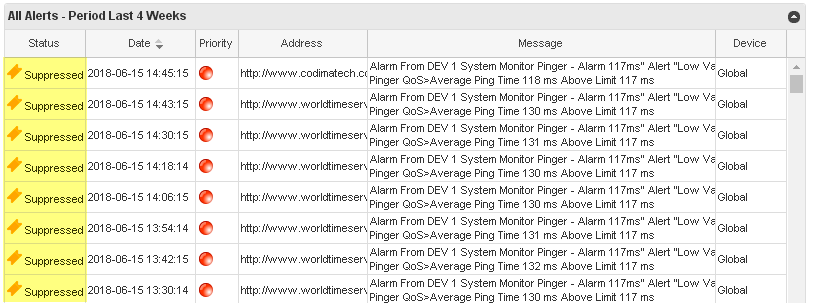
The All Alerts tab shows all Alerts including Manually Dismissed and Triage Dismissed Alerts. The list can be searched/filtered and sorted using the standard Grid features. The Suppressed Alerts refer to Alerts being auto suppressed by the Triage System.
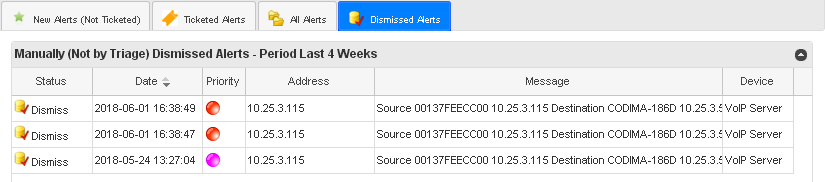
The Dismissed Alerts tab can be used to view Alerts that have been Manually Dismissed.
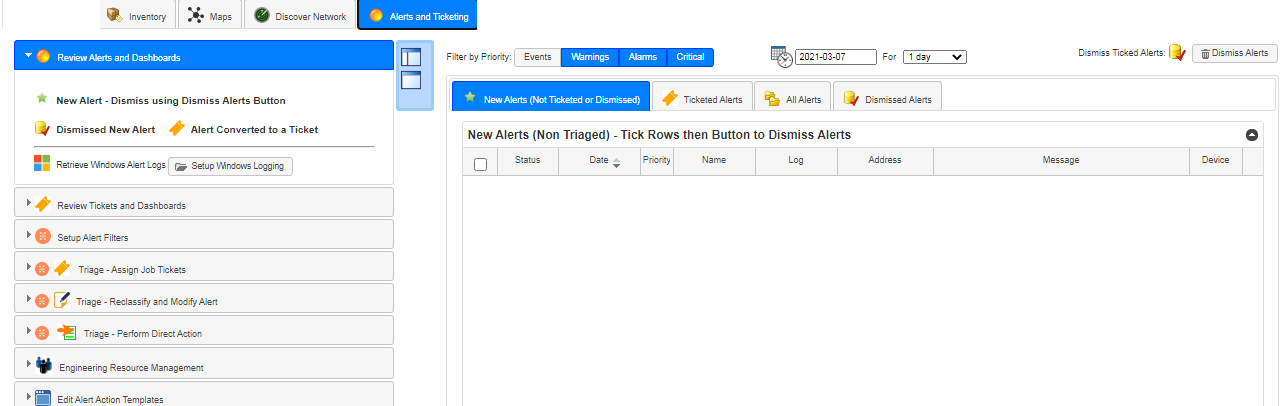
Retrieving Windows Alerts
Toolbox can talk to Windows boxes using WMI to collect Events from their Windows NT Logs and then convert them to Toolbox Alert Format. They are then processed as normal in Toolbox that means they can use Alert Filters to modify the alerts, create Tickets or send out as SYSLOG or SNMP Traps for example.
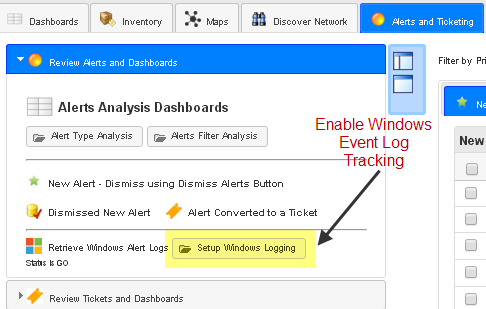
The Windows Alert processing is setup by clicking on the Setup Windows Logging button as in the picture below:
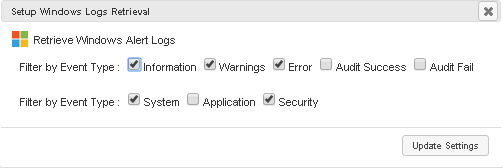
The following Dialog appears. Select which Windows Logs and what Priorities of Alerts you want to retrieve from the Windows System.
Using Alerts and Simple Alert Dismissal
This Panel shows the Alerts under several classifications that show what is happening both for the Simple Dismiss Alerts system or the Triage System Results.
Using the Simple Manual Alerts Dismiss system click on the tick boxes on the Grid Rows to select the Alerts, then click on the Dismiss Alerts button. A popup will appear, as below:-
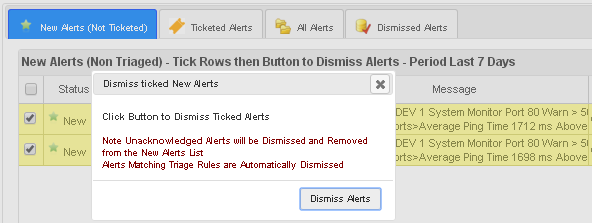
Clicking on the Dismiss Alerts button in the dialog will move the Alert to the Dismissed Alerts tab and they will no longer be Active in Toolbox e.g. in the Maps or Diagnose.
A Diagram of the Ticketing Process
Tickets can be Created Automatically by the Triage Engine or Added Manually in the Toolbox Web GUI.
Depending on the Group Assigned by the Triage Rule or the Manual Ticket Dialogue box, then the Ticket is assigned to a particular Group of Engineers. New Tickets are assigned to Engineers by Email.
The Supervisor, if Setup, is kept informed of Ticket Assignments and Failure to Respond by Email.
Communicating with Engineers by Email
Below is the Action of the Toolbox Ticketing System on Creation of a New Ticket. First the System looks for an Engineer that is Free and in the same Engineer Group as specified in the Ticket.
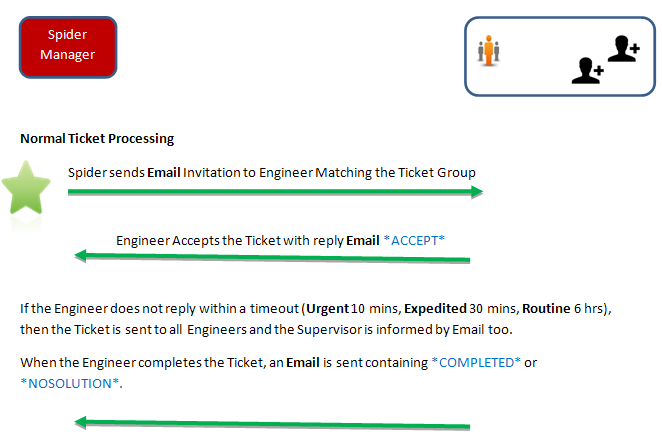
The eMail *COMMAND*s between Toolbox <-> Engineer
A Ticket is assigned to an Engineer in a format as below:
<<<You have been assigned this Ticket – Reply *ACCEPT* or *DECLINE*
*?* for command help>>>
Add Comments after the REPLY CODE (*….*) terminated by **
Priority Expedited – Ticket Reference #100103,
Created 2018-06-13 11:33:16, As Slow Ping Time
Device – http://www.worldtimeserver.com/ [http://www.worldtimeserver.com/] Global web site no vendor – Location USA
Site – Local
(Ticket Assignment Summary – Alarm From DEV 1 System Monitor Pinger – Alarm 117ms” Alert “Low Value Test” Regarding http://www.worldtimeserver.com/ [http://www.worldtimeserver.com/] Global web site no vendor Location USA
Pinger QoS>Average Ping Time 130 ms Above Limit 117 ms )
The Engineer is invited to Accept the ticket by replying with *ACCEPT* usually followed by a Comment such as “will investigate now**”. The ** is used to terminate the Engineer comment (if it is omitted the rest of the email will be logged by the system). On the Toolbox System reading the reply, it will send out a confirmation to the Engineer and the system will update status on the Ticket and the Engineer.
“*ACCEPT*” I will accept responsibility for this ticket. Ticket now registered to this Engineer.
“*DECLINE*” I cannot accept this ticket.
“*REASSIGN*” Although I accepted this Ticket I now need someone else to deal with it. The Ticket is advertised to all Engineers in Group
“*UPDATE*” Here is a Status Update, Status Updates may be Requested by the Supervisor too.
“*COMPLETED*” I have successfully completed the Ticket. The Ticket is now marked as Closed Successfully.
“*NOSOLUTION*” I have not been able to fix the problem and have marked as closed Unsuccessfully.
These are Status Message sent by the Engineer to Update the Supervisor – they do not impact existing Ticket Assignments.
“*BUSY*” I cannot Accept more Tickets, until updated by an AVAILABLE message to the Toolbox System.
“*AVAILABLE*” I can now accept new Tickets
“*SICK*” – reporting in Ill
“*HOLIDAY*”, – reporting in On Holiday
“*HELP*” or “*?*” – Request for a full list of Commands and their meaning.
Using the Ticket Summary Dialog
The righthand side Window contains the Ticket Summary Grid which give a live update of Ticket Status:
On clicking on a Ticket Row the Ticket Summary appears as below:
Here it is possible to Cancel the Ticket immediately, Request an Update from the assigned engineer, or Re-Assign the Ticket to another Engineer.
The Ticketing Panel Description
This Panel gives access to several Ticketing features:
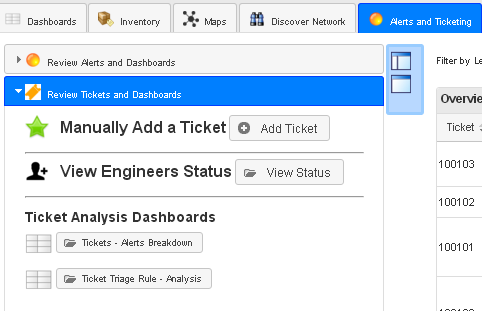
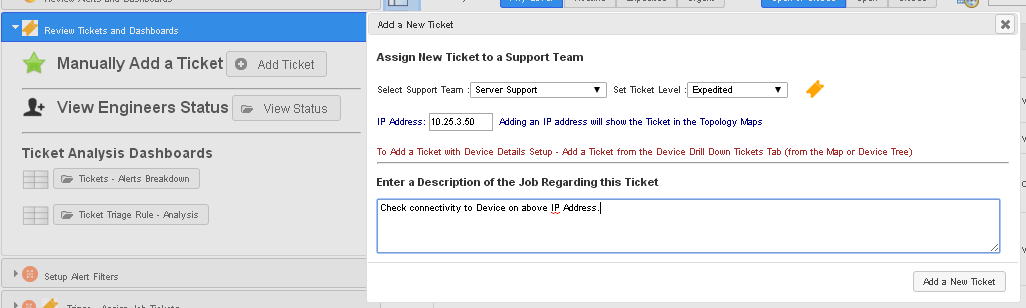
A New Ticket can be added directly to the Ticketing System by the Operator without going through the Alerts Triage System by clicking on the Add Ticket Button, as below:
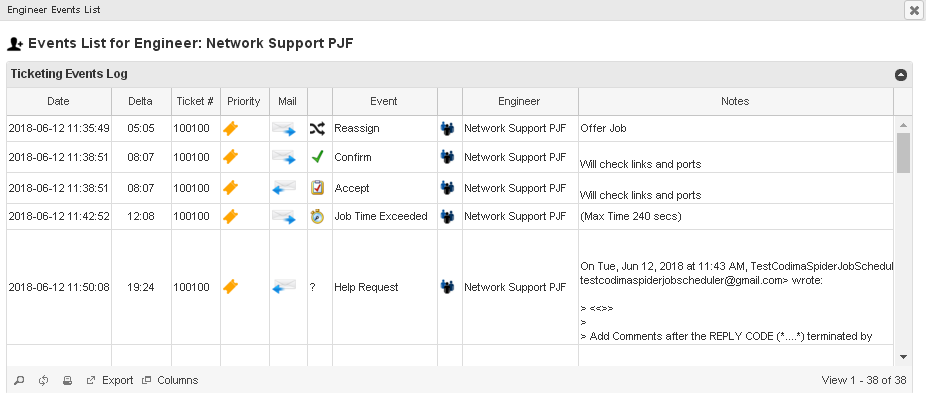
The Status of all Engineers regarding Ticket Progress and a further drill down to individual Ticket Events is available, as below:

Clicking on a Grid Row will bring up an analysis of events for that Engineer as below:
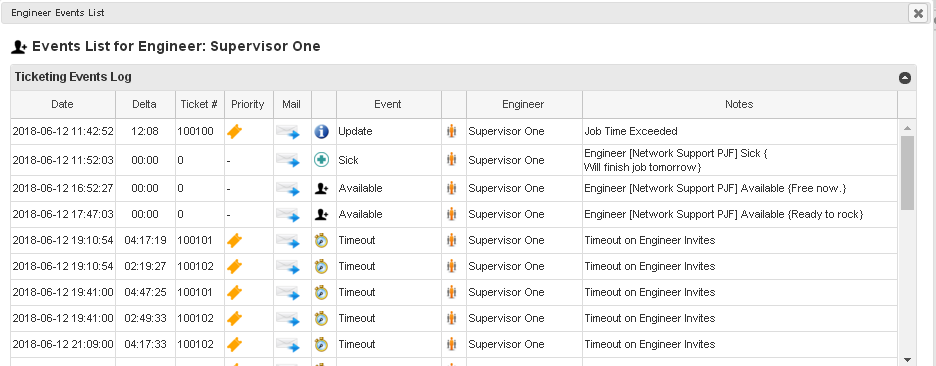
Clicking on a Grid Row for a Supervisor, also brings up an Event List for the Supervisor:
Using Alert Filters
This panel allows the user to define very broadly based Alert Filters like simple Alert Priority or very detailed such as a complex Alert Text match with multiple match components.
They are used primarily in Triage of Alerts but can also be used to Filter Alert Animations in the Topology Maps of the Toolbox product.
Toolbox Alert Groups

This matcher matches Toolbox internal alert type Groups, it is added for completeness rather than a frontline feature. Groups can be seen in raw Alerts by switching on the Groups Grid Column to learn the Toolbox internal group names.
Setting up Alert Filters in Detail
To Add a new Alert Filter, simply click on the button highlighted in yellow below:

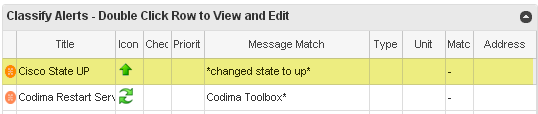
To Edit an existing Alert Filter double click on a Grid Row, as below:
To add or modify an Alert Filter the Alert Filter Dialog pop-up is used, as below:
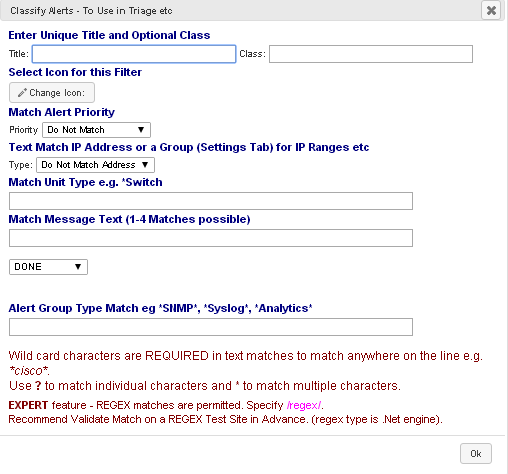
Although this pop-up has very many options, typically, only one or a few are actually required.
The various options are now described one by one.
Filter Title, Class and Icon

Key for the filter is to enter a UNIQUE title. It is important that the Name needs to say what the filter Matches.
An optional Class may also be added that is useful to categorise Filters like for example Security alert matching. Note: Class can be shown in the Alerts Grid by adding the Class Column by clicking on the Columns Icon at the bottom of the Grid.
Additionally, an optional Icon may be added to the Filter Match. This is highly recommended to make Filters more graphical throughout the Toolbox System.
Match Alert Priority
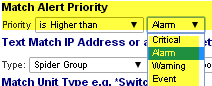
The incoming Alert Priority can be matched by first selecting the Condition and then the Priority Level in two dropdown menus. Useful for matching high priority alerts probably combined with some Alert filter match property.
Match IP Address or a Toolbox Group

This can be used to match a whole IP Address or a fragment of an IP address like “10.26.”, by selecting the IP Address Type: option.
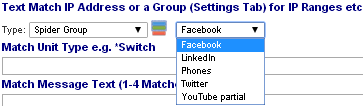
By selecting a Group Type: option the filter will look for IP Addresses in the Specified Group IP Range(s). Note: Groups are setup under the Setting Tab->Groups Panel.
Match Unit/Device Type

This is used to match Device (Unit) types like Switch, Router, Server or other types. To match, say Layer 3 and also Layer 2 switches, match *Switch so the match begins with a wildcard * character (i.e. match L3 Switch and also Switch).
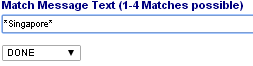
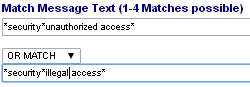
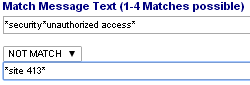
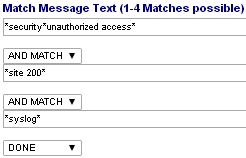
Match Message Text
This is probably the most important matcher as it matches the content of the message, like a Syslog Message content or an SNMP Trap content or Toolbox Generated Alerts like Threshold Breaches etc.
The matcher makes full use of Wildcards like * and _ – to wildcard multiple or single characters respectively.
The matcher can have from 1 up to 4 individual matcher terms that can be ANDed or ORed together.
One Term
Two ORed Terms
Two Terms with a Not Match exclusion Term
Three Terms ANDed match.
Using Triage to Job Ticket System
The triage system depends on Alert Filters, see below:
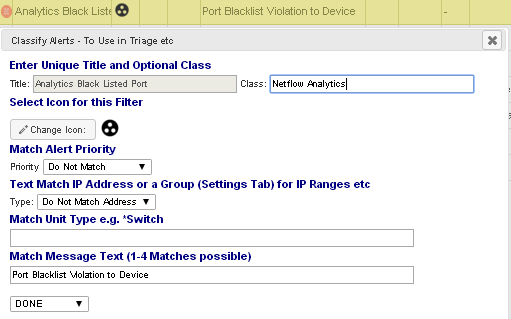
An Alert Filter has been created to Match Alerts coming from Toolbox Netflow Analytics, for example.
The Triage references the Filter as below to start a Triage Action – in this case to create a Job Ticket.
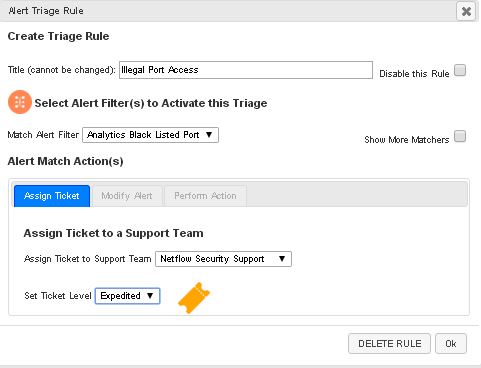
The Title is the Name of the Triage Rule which is set by the user and should describe the Triage Rule.
Absolutely key is the Match Alert Filter, which is a dropdown list of all the Alert Filters that are in the System, setup under the Alert Filters panel.
There can be several Alert filters which all can be associated with a Triage Rule and are processed by the Toolbox to create many Reports showing the drill downs of why the Triage was triggered. For instance, Alert Filters can be setup to Track Alerts for Pinger, TCP Port and Web Page Access which will all be associated with the Rule Trigger. Other Points of Failure such as intermediate Links and Devices can be Tracked with Alert Filters (e.g. based on SNMP or Pingers) such as dropped packets, slow response to add more information and analysis in the Triage Rule drill reports.
The Match Actions for this Job Ticket Triage Rule specify which Support Team will be Assigned the Ticket. There are several standard Teams setup by Toolbox, but the user can add as many Support Teams as required. The Priority drop down selects Urgent, Expedited or Routine which influences directly how the Tickets are processed when assigning and progressing Tickets. Urgent Tickets will be chased more aggressively than Routine Tickets by the Toolbox Job Tracking system
The Job Tickets are also shown in the Live Network Maps including from Remote Probes.
Using Triage to Modify Alerts
The Modify Alerts system works on individual Alerts that Match one or more Alert Filters.
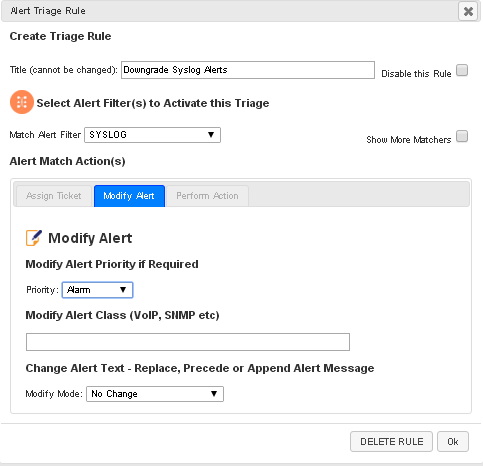
The Modify Alert rule should be given a Unique descriptive Title.
One or more Alerts Filters are selected to trigger this Modify type Triage Rule.
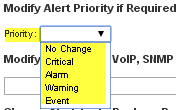
To optionally modify the Alert Priority, select a priority using the Priority: drop down control. This can be used to downgrade Alert priorities to reduce importance of matching Alerts, or alternatively, upgrade priorities on the specified Alert Filter matching Alerts.
The Alert Group (Class) can be changed if a better or alternative grouping is known, based on Alert Filter matching.
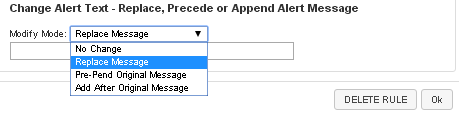
The Alert Text can be modified for matching Alerts to either Prepend Text, Replace Text or Append text to the Alert. Useful to explain cryptic Alerts or translate foreign language content to match the local site language.
Note: Alert Modification is done before any other Alert Processing is done.
Using Triage to Perform Direct Action
This Triage type allows a range of actions to be performed such as converting Alerts into different Alert types like SNMP, Email or Syslog. Additionally, it can Trigger Execution of predefined Server Scripts. It can also be used to Copy Traps and Syslog for example to forward to another destination like a special management station.
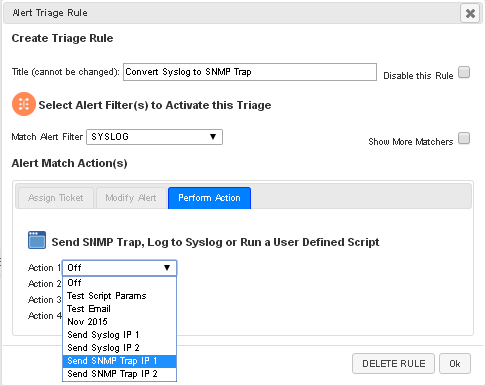
As with other Triage types the mechanism is driven by Matching a predefined Alert Filter.
Ticket Creation and Processing
Tickets are created by the Alerts and Triage system and optionally manually by the Toolbox User.
To process Tickets needs a list of Engineers and optionally Supervisor(s). When a new ticket is created, the system scans the list of Engineers looking for a free Engineer that Matches the Support Group of the Ticket. Support groups are predefined in Toolbox, but the user can add other groups, for instance for Geographical Regions.
When a matching FREE engineer is found then system will email a Job Ticket to that Engineer. The Engineer can choose to *ACCEPT* or *DECLINE* that ticket in a reply email. The system depends on the Ticket Reference #999999 in the email Subject line (do not edit) to track responses from Engineers.
Engineers can asynchronously report unforeseen circumstances like illness at any time to the system and likewise availability. Holidays and availability are tracked by the system based on submitted plans to Toolbox. See The eMail *COMMAND*s between Toolbox <-> Engineer.
Tickets are processed following the rules set-up by the Edit Rules and Time-outs button. This specifies Time-outs (per Ticket Priority) and Procedures like when the Supervisor is updated by email on Assignments and procedure failures.
Full List of Engineer Requests
These messages are automatically sent to the Engineer by the System.
“You have been assigned this Ticket – Reply *ACCEPT* or *DECLINE*”
“Job Ticket Offer to Any Engineer – Reply *ACCEPT* to take this Ticket”
“The system has Acknowledged you have ACCEPTED this Ticket.\n You can supply progress details using further *UPDATE* replies and *COMPLETED* when Ticket is completed successfully.\n Reply *REASSIGN* to relinquish this Ticket.\n Reply *NOSOLUTION* to indicate not fixable”
“There was no Response from you to Ticket Assignment – Reply *ACCEPT* or *DECLINE*”
“Can you update the system on Progress – Type *UPDATE* then details or *CLOSED* or *REASSIGN* or *NOSOLUTION*”
“The system did not recognise your response – please respond with the Correct Reply Text “
“The system did not recognise your last response – the Ticket details will be re-sent now (do not modify the Header Line)”
“The system has Acknowledged you have DECLINED this Ticket.”
“Supervisor – Ticket has been assigned to “
“Supervisor – Ticket Assignment Timeout – Re-Assigning Ticket”
“Ticket Completed Confirm”,
“Ticket No Solution Confirm”,
“UPDATE receipt confirm”,
“The system has Acknowledged you have RE-ASSIGNED this Ticket.”,
“The System Operator has Cancelled this Ticket.”,
“The System Operator has Re-Assigned this Ticket.”,
“Maximum Job Time Exceeded for this Ticket.”,
“Help – *ACCEPT* offered ticket\n*COMPLETED* ticket completed ok\n*UPDATE* add details to ticket\n*REASSIGN* re-allocate ticket to engineers\n*NOSOLUTION* close not fixed\n\nTo Supervisor Status Update – *BUSY*, *AVAILABLE*, *SICK*, *HOLIDAY*”